Oh My Zsh There Was an Error Updating Try Again Later
What is Z Shell Concluding?
Z beat (Zsh) is a powerful Unix command interpreter (shell) with lots of interactive features. Information technology is the default shell of MacOS, also available for Linux and Windows users. Simply like the Linux-native Bash shell, Zsh is as well a scripting linguistic communication that allows y'all to write your own scripts and automate tasks.
In this guide y'all are going to install Zsh with its configuration management framework Oh My Zsh, and commencement using some of its amazing productivity tweaks, like:
- Improved Directory Navigation
- Advanced Tab Car-completion
- Enhanced History Search
- Custom Themes
- Custom Plugins
- And more!
Zsh vs Bash differences
Both Zsh and Fustigate are open-source command-line interpreters that are widely adopted. Zsh is backwards compatible to Bash with nearly identical syntax, making a transition between the two non complicated at all. Most of the commands and interaction patterns you have learned for bash will besides work in Zsh.
Speaking well-nigh the differences, Zsh has much more interactive customization features than Bash. Users have many more than possibilities to personalize their shell by setting upwardly a theme and tapping into a vast ecosystem of Zsh plugins that introduce many little interactivity tweaks.
Although incremental gains may look modest at starting time glance, all those little productivity tweaks accumulate, and y'all are quickly taken to the next level or command-line operation.
Oh My Zsh Community
Oh My Zsh is an open-source, community-driven framework for managing your Zsh configuration. With more than 140 pre-built themes and 300 plugins it is a great place to start customizing your Zsh last and unleash your new control-line superpowers.
Prerequisites
To follow along you will need:
- A working Ubuntu xx.04 car
- A basic understanding of the control-line interface
Install Zsh on Ubuntu 20.04
Before starting any installation, information technology is always a good idea to update your software repositories. Open up your good old Fustigate final and utilize the following control:
sudo apt update
After this is done, you are ready to install Zsh from official Ubuntu repositories. We are here using -a selection to automatically agree to all installation prompts:
sudo apt install -y zsh
You can make certain that Zsh is installed past looking at the path to its binary file:
which zsh
The output should await similar this:
/usr/bin/zsh
As you take successfully installed Zsh, you tin can now make it your default shell. Utilise the chsh command with -c choice and the path to Zsh binary to do so:
sudo chsh -south /usr/bin/zsh
This will change the /etc/passwd users file to load Zsh equally your default beat out every time you login to a terminal session with your username. After restarting your last feel free to check your current crush by printing the $Trounce surroundings variable to your terminal:
echo $SHELL
The output should look like this:
/usr/bin/zsh
Congrats, Zsh is now your default concluding shell.
Install Oh My Zsh Framework
Even though you are at present using Zsh every bit your default shell, it is not that different from Fustigate nevertheless. Yous can commencement extending Zsh from scratch on your own, but information technology's a better idea to tap into the Oh My Zsh ecosystem and experiment with what has already been created by the community.
Oh My Zsh installation takes merely a few steps. First, run the apt install control to brand sure yous have gyre installed on your Ubuntu organization:
sudo apt install curl
Either you will have curl installed, or you will be bodacious that information technology is already on your system. To showtime the installation, download and run the Oh My Zsh installation script from its official GitHub repository:
sh -c "$(curl -fsSL https://raw.github.com/ohmyzsh/ohmyzsh/main/tools/install.sh)"
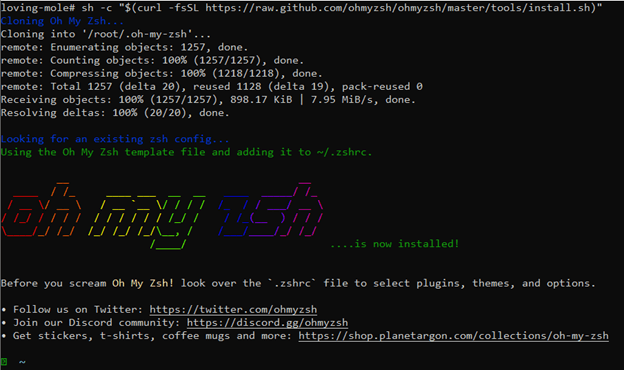
It takes just a few seconds and voilà! you lot have Oh My Zsh installed.
Utilise Basic Oh My Zsh Functionality
At that place are many great productivity tweaks that y'all tin starting time using right away afterward installing Oh My Zsh. Let'south review some of its functionality.
Working With Directories in Zsh
A lot of time is spent in the terminal navigating through your directories. Being able to enhance basic navigation is the first superpower you are going to get from the Oh My Zsh framework.
Directory Path Expansion
In that location's no longer a need to type in the full directory path in order to employ it. Y'all may enter the showtime few letters of the directory names and press TAB to aggrandize your hint into a full path. For case, type /e/iii.8 and printing TAB to have it expanded into /etc/python3.viii.
Swift Directory Access
Y'all tin now omit the cd command and type the path to your preferred directory direct in the terminal to get into information technology. For instance, type ~ to cd into your home directory or / to cd into your root directory.
Directory Access History
Zsh keeps a history of the accessed directories. Y'all may check it by using the d command that is aliased for dirs -v | caput -x to run across 10 latest directories yous were in:
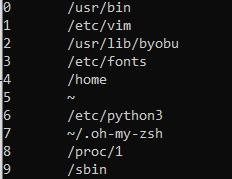
Use the associated number access a directory from your history cache. For isntance, blazon three and printing ENTER to get into /etc/fonts.
Advanced Tab Autocompletion in Zsh
Another powerful Zsh feature is its tab completion system. Information technology tries to suggest available commands according to the command-line context. For instance, it may advise your available scripts, environment variables, commands and even command options.
Type organization and printing TAB to get a list of auto suggestions. You lot may hit TAB again to beginning navigating through the available programs. Use TAB or arrow keys to navigate through the list:
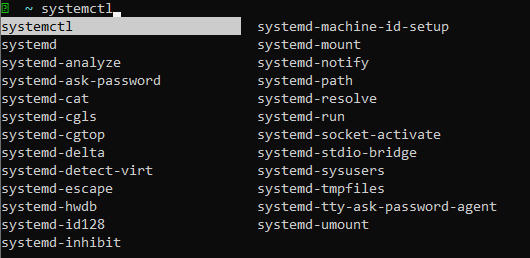
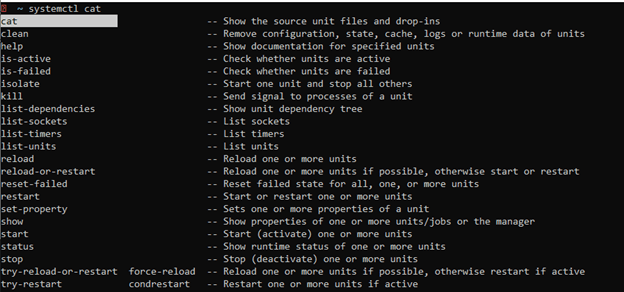
Similarly, type systemctl, put a infinite so hit TAB to get a listing of available systemctl commands with their descriptions. Hit TAB once again to offset navigating through the listing:
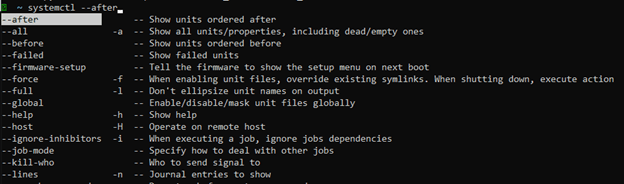
Enter systemctl - and hit TAB a few times to navigate through a list of available systemctl options with their descriptions:
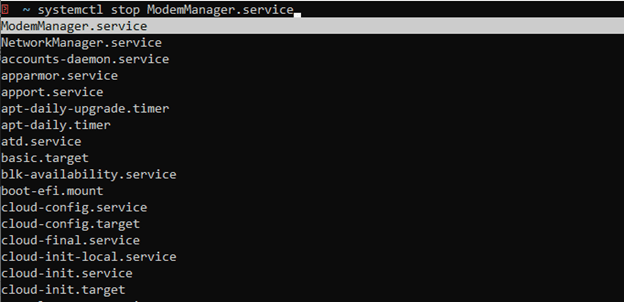
And if you want to see some truthful magic happening, blazon systemctl stop, put a space, and hit TAB to see a list of all available Linux processes that are currently running on your machine and are eligible for systemctl stop control:
It's easy to first using advanced tab autocompletion, and the productivity boost is significant. Make it some other tool in your command-line armory.
Enhanced History Search
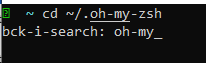
Typically, you lot would employ CTRL + R to invoke reverse history search. It allows you lot to search for whatever word in your command string in your command history. Press CTRL + R and blazon a substring oh-my to find the terminal control with this substring:
Y'all may proceed pressing CTRL + R to get backwards through history. Alternatively, employ CTRL + S to become frontwards.
Zsh introduces one little tweak to this functionality. If you call up the beginning of a command that you lot are looking for, blazon it in and use Upward and DOWN keys to traverse back and forth through the history filtered past your given substring. For instance, enter apt and hit Up to find the terminal control beginning with this substring.
Install a Theme for Zsh
The commencement matter you notice when someone is using Zsh is its unique appearance. A theme is a predefined prompt configuration that adds distinctive colors and some useful data to your terminal.
Oh My Zsh comes with more than than 140 predefined themes for you to choose from. Cheque ~/.oh-my-zsh/themes directory to see the total list of installed themes:
ls ~/.oh-my-zsh/themes
Let'due south now change the default "robbyrussel" theme to something more than beautiful and informative. To do then yous demand to open your Zsh configuration file:
vim ~/.zshrc
And change the ZSH_THEME variable by setting its value to your preferred theme, for instance:
ZSH_THEME="strug"
Salve the .zshrc configuration file and load it once more:
source ~/.zshrc
You lot can now see a new theme has been loaded:
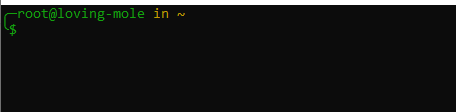
This theme includes your username root, hostname loving-mole, and electric current directory ~ in your prompt.
And if you move to a directory where Git has been initiated, yous volition automatically see which co-operative you are on:
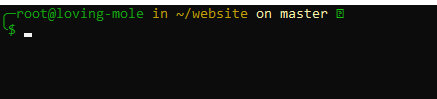
Not a revolution, but it will spare you a few unnecessary git branch commands every now and then.
Enable Zsh Plugins
A Zsh plugin is a set of useful aliases and functions designed to make you more productive when using your favorite command-line tools. Oh My Zsh comes with more than than 300 pre-built plugins that are available out-of-the-box.
Past default, pre-congenital plugins are disabled. Yous may find a list of locally installed plugins in the ~/.oh-my-zsh/plugins directory. In lodge to enable a plugin in Oh My Zsh, modify the plugins line of the .zshrc configuration file past adding names of your preferred plugins separated by spaces:
plugins=(plugin_1 plugin_2 plugin_3 …)
Permit's at present enable and test some of the pre-congenital Oh My Zsh plugins.
Dirhistory plugin
Remember directory access history? This plugin improves navigation through your directories even further. It adds keyboard bindings to allow you navigate through the directory history even easier. Outset by adding dirhisotry to the configuration file:
plugins=(… dirhistory)
Save the file and reload zsh configuration:
source ~/.zshrc
It is now possible to apply the following key bindings to navigate through your directory history:
-
ALT + LEFT– go to previous directory -
ALT + Correct– get to adjacent directory -
ALT + Upward– motion into parent directory -
ALT + DOWN– move to the start child directory
History Plugin
Many Oh My Zsh plugins are but a bunch of practical aliases that were created by experienced arrangement administrators. History plugin provides a couple of user-friendly aliases for the history command. Turn it on by modifying the Zsh configuration file:
plugins=(… history)
And you volition have the following aliases available:
-
h(history) – prints your command history -
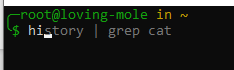
hs(history | grep) – utilise grep to search your command history -
his(history | grep -i) use grep to do example-sensitive command history search
Colored Man Pages Plugin
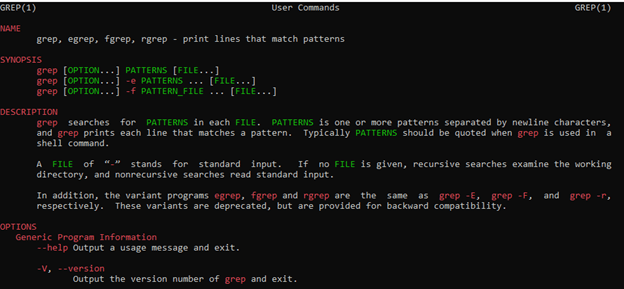
How often do you go through the assistance pages of a specific command-line utility? The Colored Man Pages Plugin makes you a faster reader past coloring different commands and their arguments to make them immediatelly noticable in the document. Enable it by modifying the Zsh configuration file:
plugins=(… colored-homo-pages)
Afterwards loading the configuration file, try using homo grep to see the inverse grep manual:
JSON Tools Plugin
JSON serves as the de facto information standard for web evolution, and you lot may often need to employ it directly in your final, especially when testing new API calls. JSON Tools Plugin makes this experience much more convenient. Try this plugin out past editing the Zsh configuration file:
plugins=(… jsontools)
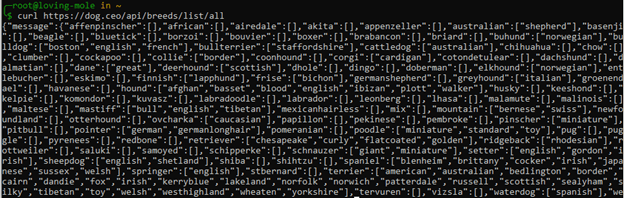
Y'all may now pipage your JSON data into an appropriate jsontool. For example, a default JSON dump is a mess that is hardly readable. Effort fetching a list of all dog breeds from the famous Dog API service but to come across how bad information technology is:
curl https://domestic dog.ceo/api/breeds/list/all
Let's pipage this JSON dump through the pretty print jsontool:
curl https://dog.ceo/api/breeds/list/all | pp_json
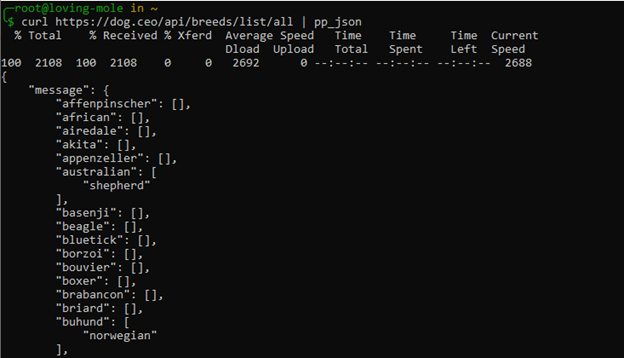
Now even humans tin can read it.
Install Custom Zsh Plugins
Aside from the default Zsh plugins that are shipped with Oh My Zsh, there are many other popular plugins that yous tin install on your own to further expand your Zsh functionality and increment your productivity.
Autosuggestions Plugin
Ane of the most popular custom Zsh plugins is zsh-autosuggestions. It suggests commands based on your history and available completions. Follow the custom installation guide to add information technology on your Oh My Zsh framework.
After installing the plugin start typing a command and autosuggest volition generate a proffer for you:
To accept the suggestion, hit END or Correct pointer.
There are many additional options and central bindings that y'all may setup for autosuggestions. Check the official documentation if you lot similar this plugin and want to customize information technology further.
Syntax Highlighting Plugin
Zsh Syntax Highlighting Plugin enables highlighting of commands whilst they are typed into a Zsh terminal prompt. Information technology is helpful when you are writing long commands where information technology is easy to make syntax errors. Follow the custom installation guide to add it on your Oh My Zsh framework.
After installing the plugin type in a slightly modified command for fetching a pretty listing of dog breeds to run into syntax highlighting in activeness:

Equally yous can see, your commands are now colorful and more informative. Legitimate commands are put in light-green, unfamiliar commands are red, command options are white, and strings are yellowish. Less syntax errors guaranteed!
Autojump Plugin
Last, but not least, is the Autojump Zsh Plugin. It gives you an even faster way to navigate your filesystem. Autojump keeps its own history file with a weighted listing of your visited directories. It then tries to guess the full path of the directory you desire to visit past the given directory name and its weight.
Follow the custom installation guide to add together autojump on your Oh My Zsh framework.
After installing autojump and using it for a while you will populate your autojump history file. You may check it with autojump -s command:
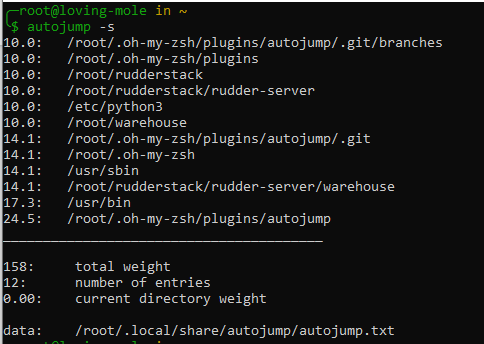
Equally you tin meet, some of the directories were visited more and have a college weight.
Permit'southward say you are now in your home directory and would like to jump into the ../warehouse directory:
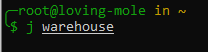
Later you lot execute the command, you are automatically taken into the ../warehouse directory with the highest historical weight:

Endeavour jumping back and forth to get used and integrate autojump into your everyday work if it works for you.
Configure Zsh Further
Afterward you had installed Oh My Zsh a startup configuration file .zshrc was created in your home directory. It is a shell startup file where you lot put your commands, aliases, functions, options, and fundamental bindings. This file is loaded automatically when yous initiate a new last session.
We have already made changes to the .zshrc file when adding custom themes and plugins. Let's now make some additional changes to solidify your Zsh environment fifty-fifty farther. Open the configuration file and start editing:
vim ~/.zshrc
Automatic Updates
You may desire to enable automatic Oh My Zsh updates. Uncomment the following line to update Oh My Zsh as soon as the new version is available:
zstyle ':omz:update' mode auto
History Timestamps
Information technology'southward likewise handy to accept a time stamp for every history command. Uncomment the following line and choose your date format to enable this characteristic:
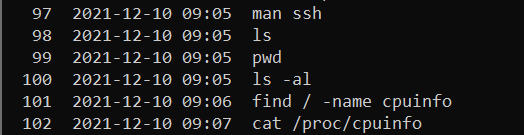
HIST_STAMPS="yyyy-mm-dd"
This volition put a timestamp next to every command that is showed past the history command:
Vim Key Bindings
If yous are an avid Vim user, enable Vim key bindings. This volition put you in the insert mode by default when you open your terminal. Hit ESC button to enter the control mode instead. You may enable Vim primal bindings with the following line:
bindkey -five
Bear in listen that this option volition disable the default emacs key bindings. For instance, you won't be able to use CTRL + R to enter the opposite search mode anymore. Yet, you lot tin redefine missing emacs cardinal bindings yourself with the post-obit blueprint:
bindkey [keys] [function]
To restore the reverse search functionality with Vim fundamental bindings add the post-obit line:
bindkey '^r' history-incremental-search-backward
This pick will re-enable CTRL + R key combination for invoking backwards history search.
Additional Aliases
You may likewise add your ain aliases to .zshrc file. For instance, let's add the following alias to make it more convenient to admission the zshrc file:
allonym zconf="vim ~/.zshrc"
Now every time you lot type zconf into the final, you will automatically vim into the .zshrc file.
Load Changes
When y'all finish making changes to the .zshrc file, don't forget to load it into your shell. The source control volition read and execute commands from a specified file and load them into your current shell environment:
source ~/.zshrc
Conclusion
You may continue modifying your Zsh surroundings farther and add together your own tweaks. There are no limits to how you can change your command line environment, since Zsh is also a powerful scripting language. If you decide to go down this rabbit hole, brace yourself and take await at the official zsh documentation.
Source: https://www.cherryservers.com/blog/how-to-install-and-start-using-oh-my-zsh-on-ubuntu-20-04
0 Response to "Oh My Zsh There Was an Error Updating Try Again Later"
Post a Comment